ATmega4809 Curiosity Nano
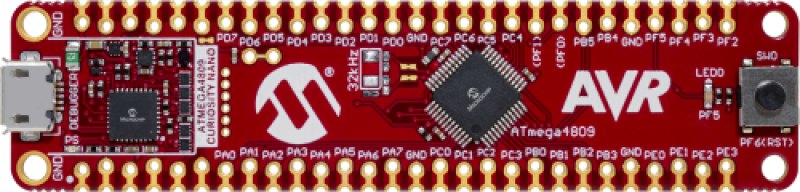
The ATmega4809 Curiosity Nano board is an evaluation board from Microchip featuring one of the largest 0-series AVR microcontrollers. heads for breadboard use, as well as serrated edges in case you choose to surface mount it. The board has a built-in programmer/debugger so you can program the chip via USB. They also added a user definable button and LED to the end of the board. This board is long, with all 41 GPIO pins broken out, eight of which are for analog inputs. (Although sixteen of the pins can be connected to the 10-bit ADC, some of these pins perform dual functions.)
The ATmega4809 chip has all the features we've come to expect from AVR microcontrollers, with just a little more of certain things. It is the largest variant of the ATmega 0 series, with a 48-pin package. The chip has 48 KB of flash memory and 6 KB of SRAM, two advancements over the Arduino Uno's ATmega328. The chip can run at 16 or 20 MHz from an internal oscillator, or can run at very low power from a 32.768 kHz internal oscillator. It can support SPI and I2C, as well as up to four USART connections. Five of the GPIO pins, including one of the USART pairs, are connected to the debugger, but all can be disconnected by cutting the exposed jumpers at the bottom of the board. The chip also has a Custom Configurable Logic peripheral consisting of four lookup tables that can be connected to external pins.
When you first connect the board via USB, the debugger will mount itself as a mass storage device. Upon opening the device, you will find files containing board status information, version information, and a link to the Curiosity Nano product page. Compiled HEX files can be dragged and dropped onto the device to easily program the microcontroller from the file system. The debugger also creates a serial port which is connected to one of the USART pairs on the chip so you can watch debug messages from your code. Another nice feature of the debugger is that it can tell the adjustable voltage regulator to change the I/O voltage on the board. By writing a command to a text file and dropping it on the mass storage device, you can switch the voltage between 1.8V, 3.3V, and 5V. You can also issue commands to reset the microcontroller, clear its flash or change the baud rate of the serial connection. These commands are detailed in the Hardware User's Guide.

To program the ATmega4809 Curiosity Nano, Microchip recommends using Atmel Studio 7 or MPLAB X IDE. Upon opening either development environment, you will find that the map has been automatically detected and a page of relevant links for the map is presented. I clicked on the link to sample programs on Microchip's Github repository. There I found a sample program for Atmel Studio that shows how to use the USART ports on the board. There were also sample programs for Atmel Studio and MPLAB showing how to get started with freeRTOS. I used MPLAB's Git integration in the "Team" menu to clone the freeRTOS example. When opening the project, your version of MPLAB may complain that it needs additional modules and you need to follow the links to resolve them. You may even need to install Microchip's cross compiler for this example to work. Those unfamiliar with MPLAB or Atmel Studio may have difficulty getting the samples to work.
After some research, I found that there was 3rd party support for programming this board in Arduino IDE. Although the ATmega4809 chip has been used in official Arduino products, their pinouts and functionality do not match Curiosity Nano. By installing MegaCoreX and selecting ATmega4809, you can program the board like any other board. Be sure to choose "48 pin standard" pinout and "Atmel nEDBG/Curiosity Nano" programmer. I found the documentation on the Github page for MegaCoreX to be quite comprehensive. Best of all, there is a...
The ATmega4809 Curiosity Nano board is an evaluation board from Microchip featuring one of the largest 0-series AVR microcontrollers. heads for breadboard use, as well as serrated edges in case you choose to surface mount it. The board has a built-in programmer/debugger so you can program the chip via USB. They also added a user definable button and LED to the end of the board. This board is long, with all 41 GPIO pins broken out, eight of which are for analog inputs. (Although sixteen of the pins can be connected to the 10-bit ADC, some of these pins perform dual functions.)
The ATmega4809 chip has all the features we've come to expect from AVR microcontrollers, with just a little more of certain things. It is the largest variant of the ATmega 0 series, with a 48-pin package. The chip has 48 KB of flash memory and 6 KB of SRAM, two advancements over the Arduino Uno's ATmega328. The chip can run at 16 or 20 MHz from an internal oscillator, or can run at very low power from a 32.768 kHz internal oscillator. It can support SPI and I2C, as well as up to four USART connections. Five of the GPIO pins, including one of the USART pairs, are connected to the debugger, but all can be disconnected by cutting the exposed jumpers at the bottom of the board. The chip also has a Custom Configurable Logic peripheral consisting of four lookup tables that can be connected to external pins.
When you first connect the board via USB, the debugger will mount itself as a mass storage device. Upon opening the device, you will find files containing board status information, version information, and a link to the Curiosity Nano product page. Compiled HEX files can be dragged and dropped onto the device to easily program the microcontroller from the file system. The debugger also creates a serial port which is connected to one of the USART pairs on the chip so you can watch debug messages from your code. Another nice feature of the debugger is that it can tell the adjustable voltage regulator to change the I/O voltage on the board. By writing a command to a text file and dropping it on the mass storage device, you can switch the voltage between 1.8V, 3.3V, and 5V. You can also issue commands to reset the microcontroller, clear its flash or change the baud rate of the serial connection. These commands are detailed in the Hardware User's Guide.
To program the ATmega4809 Curiosity Nano, Microchip recommends using Atmel Studio 7 or MPLAB X IDE. Upon opening either development environment, you will find that the map has been automatically detected and a page of relevant links for the map is presented. I clicked on the link to sample programs on Microchip's Github repository. There I found a sample program for Atmel Studio that shows how to use the USART ports on the board. There were also sample programs for Atmel Studio and MPLAB showing how to get started with freeRTOS. I used MPLAB's Git integration in the "Team" menu to clone the freeRTOS example. When opening the project, your version of MPLAB may complain that it needs additional modules and you need to follow the links to resolve them. You may even need to install Microchip's cross compiler for this example to work. Those unfamiliar with MPLAB or Atmel Studio may have difficulty getting the samples to work.
After some research, I found that there was 3rd party support for programming this board in Arduino IDE. Although the ATmega4809 chip has been used in official Arduino products, their pinouts and functionality do not match Curiosity Nano. By installing MegaCoreX and selecting ATmega4809, you can program the board like any other board. Be sure to choose "48 pin standard" pinout and "Atmel nEDBG/Curiosity Nano" programmer. I found the documentation on the Github page for MegaCoreX to be quite comprehensive. Best of all, there is a...
What's Your Reaction?