Free online schedule maker with Homebase
Google Calendars and Excel spreadsheets can help you create basic calendars for small businesses. But it's time to take it a step further with an easy-to-use online scheduling tool that will save you hours each week and make it easy to share and update your schedule.
Homebase's free employee scheduling software is packed with features to customize your schedule and create it automatically, week after week.
But don't take our word for it: try it out for yourself! It only takes a few minutes to create a free Homebase account.
Before you do, let's break down how our online schedule maker works so you can see how much time and stress you'll save by creating your weekly and monthly schedule with our free tool.
Give your team the tools they deserve.Homebase helps you create a great place to work.
Find out more
How does our free online timetable creator work?We know that some scheduling apps can be difficult to use or take hours to learn. That's why we designed ours to be simple and easy to understand, even without a tutorial.
1. Create your free Homebase account to get started. You'll be asked a few quick questions about your business, like the name and number of employees you have. It should only take a few minutes.
Once you have answered the questions, you will see the planning tool.
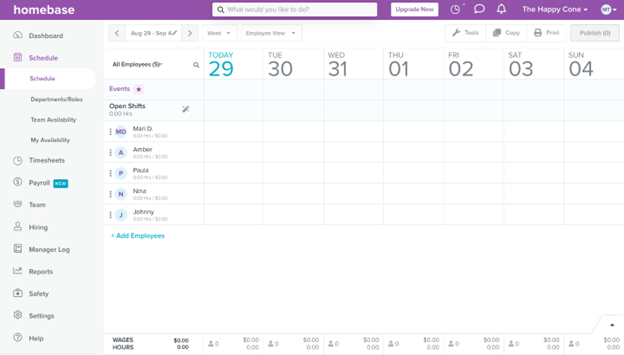
This is where you will fill in more information about your employees.
But before you add them, the first name you'll see is the one you provided when creating an account.
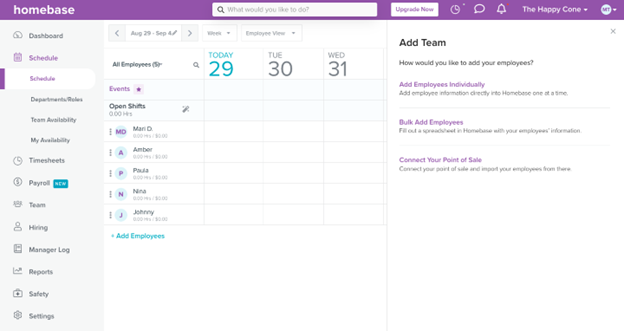
2. Select "+ Add Employees" to add more people to the schedule.
You can add employees individually, using a spreadsheet, or directly from your point-of-sale (POS) system.
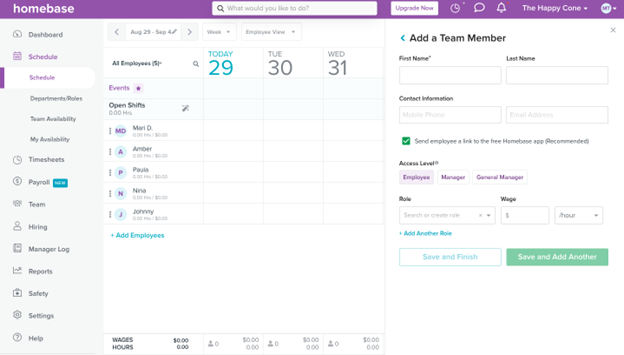
3. Add information about your employees, including first and last name, contact information, role, salary, and when they get paid (hourly or salaried).
If you want to share the schedule with your team via phone or email notification, we recommend including that information at this stage. You can also choose to add only their first name.
4. Now it's time to make your schedule!
View your schedule by week, month or day by accessing the drop-down menu at the top of the page. You can also view the calendar at the "Employee", "Department" or "Role" level. We will create a weekly schedule in this guide.
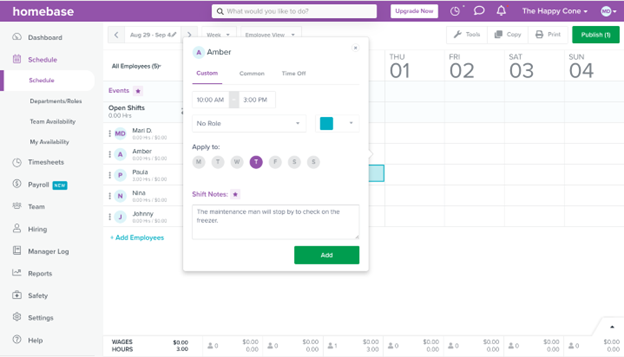
Create a team by selecting the employee you want to schedule and the team date, then selecting "add".
Once you do, a popup will appear where you can customize that employee's schedule with a start and end time for that day and week, label the shift with a color and even add shift notes like in the image below.
5. To duplicate a shift, hover over an employee's shift and select the "Copy" icon. Then tap "Exit" at the bottom of the screen when you're done copying and pasting.
If you want to move a shift, select the double...

Google Calendars and Excel spreadsheets can help you create basic calendars for small businesses. But it's time to take it a step further with an easy-to-use online scheduling tool that will save you hours each week and make it easy to share and update your schedule.
Homebase's free employee scheduling software is packed with features to customize your schedule and create it automatically, week after week.
But don't take our word for it: try it out for yourself! It only takes a few minutes to create a free Homebase account.
Before you do, let's break down how our online schedule maker works so you can see how much time and stress you'll save by creating your weekly and monthly schedule with our free tool.
Give your team the tools they deserve.Homebase helps you create a great place to work.
Find out more
How does our free online timetable creator work?We know that some scheduling apps can be difficult to use or take hours to learn. That's why we designed ours to be simple and easy to understand, even without a tutorial.
1. Create your free Homebase account to get started. You'll be asked a few quick questions about your business, like the name and number of employees you have. It should only take a few minutes.
Once you have answered the questions, you will see the planning tool.
This is where you will fill in more information about your employees.
But before you add them, the first name you'll see is the one you provided when creating an account.
2. Select "+ Add Employees" to add more people to the schedule.
You can add employees individually, using a spreadsheet, or directly from your point-of-sale (POS) system.
3. Add information about your employees, including first and last name, contact information, role, salary, and when they get paid (hourly or salaried).
If you want to share the schedule with your team via phone or email notification, we recommend including that information at this stage. You can also choose to add only their first name.
4. Now it's time to make your schedule!
View your schedule by week, month or day by accessing the drop-down menu at the top of the page. You can also view the calendar at the "Employee", "Department" or "Role" level. We will create a weekly schedule in this guide.
Create a team by selecting the employee you want to schedule and the team date, then selecting "add".
Once you do, a popup will appear where you can customize that employee's schedule with a start and end time for that day and week, label the shift with a color and even add shift notes like in the image below.
5. To duplicate a shift, hover over an employee's shift and select the "Copy" icon. Then tap "Exit" at the bottom of the screen when you're done copying and pasting.
If you want to move a shift, select the double...
What's Your Reaction?