Gameboy Doctor: debug and fix your gameboy emulator
Are you building a Gameboy emulator? Are you stuck? Failing the Blargg test ROMs and not sure why?
Gameboy Doctor can help! (github link)
Gameboy Doctor is a tool that compares your emulator to a sample emulator that passes Blargg's test ROMs. It finds the exact tick mark where your emulator's state diverges from the example, helping you isolate and fix your bugs. You don't need to have an LCD implemented to use it, and you don't even need to be able to successfully get any type of pass/fail message from Blargg! All you need is a poorly functioning processor and motherboard.
TermsJust Python3, no 3rd party libraries.
How to use Gameboy Doctor? 0. Clone repositoryThe tool is available on GitHub - clone it using git.
1. Choose a test ROMChoose an individual test ROM cpu_instrs (these are currently the only ones supported by Gameboy Doctor - see below)
2. Make 2 adjustments to your emulatorYou will need to make 2 changes to the inner workings of your emulator. They'll probably take about 20 minutes to do, but they'll save you hours and days of aimless debugging. The changes are:
Initialize the CPU state to the state it should have immediately after running the boot ROM: Register Assess A 0x01 F 0xB0 (or CH-Z if managing flags individually) B 0x00 VS 0x13 D 0x13 E 0xD8 H 0x01 L 0x4D PS 0xFFFE computer 0x0100 Hardcode your LCD (or your motherboard's memory card if you haven't implemented an LCD yet) to return 0x90 when the LY register is read (memory location 0xFF44). This is what I did when generating my example logs, because returning a constant prevents false log discrepancies. 3. Save your CPU stateNext, update your emulator to write the CPU state after each operation to a log file. Use a new line for each tick and use the following format for each state (replace the sample numbers with your CPU values):
A:00 F:11 B:22 C:33 D:44 E:55 H:66 L:77 SP:8888 PC:9999 PCMEM:AA,BB,CC,DDAll values between A and PC are the hexadecimal encoded values of the corresponding registers. The final value (PCMEM) corresponds to the 4 bytes stored in the memory locations near the PC (ie the values at pc,pc+1,pc+2,pc+3).
Run your emulator and get a log file. You can stop the program at any time - Gameboy Doctor will tell you if your log file is fine but terminates before the test ROM has completed its assertions. If you pass the test, your emulator will display the word "Passed" on the LCD and write the bytes for the word "Passed" to the serial output. However, you don't need to pass or even complete the tests to use Gameboy Doctor.
4. Send your log file to Gameboy DoctorOnce you have your log file, feed it into Gameboy Doctor as follows:
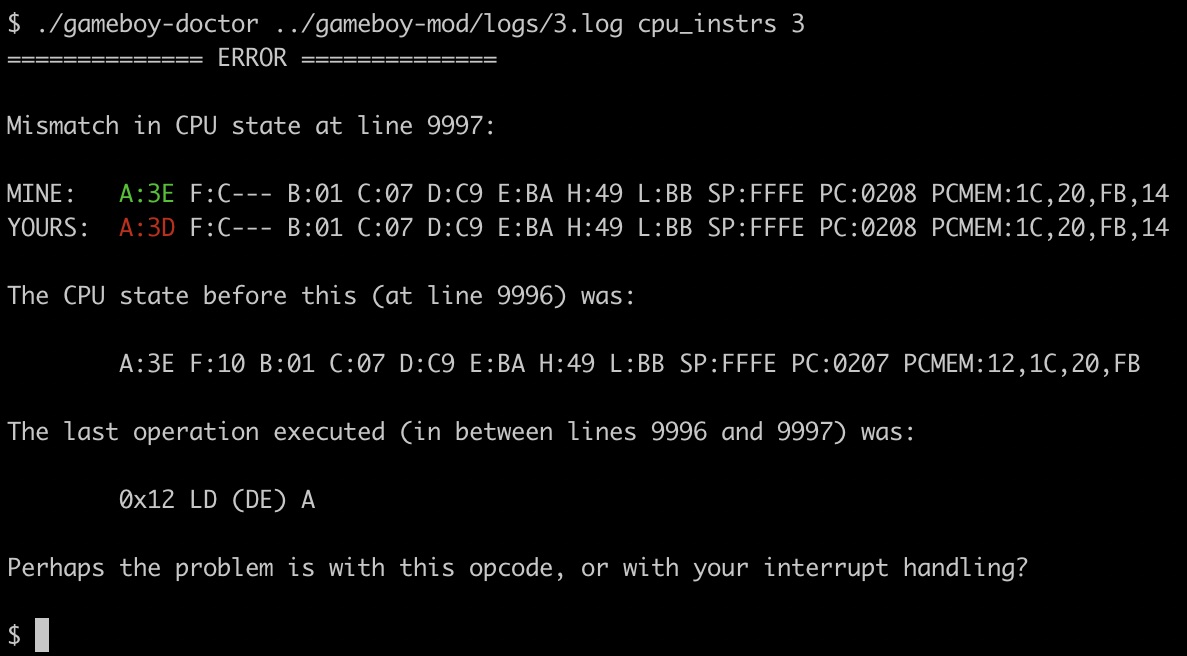
./gameboy-doctor /path/to/your/logfile $ROM_TYPE $ROM_NUMBERFor example, to check the 3rd ROM cpu_instrs:
./gameboy-doctor /path/to/your/logfile cpu_instrs 3
Are you building a Gameboy emulator? Are you stuck? Failing the Blargg test ROMs and not sure why?
Gameboy Doctor can help! (github link)
Gameboy Doctor is a tool that compares your emulator to a sample emulator that passes Blargg's test ROMs. It finds the exact tick mark where your emulator's state diverges from the example, helping you isolate and fix your bugs. You don't need to have an LCD implemented to use it, and you don't even need to be able to successfully get any type of pass/fail message from Blargg! All you need is a poorly functioning processor and motherboard.
TermsJust Python3, no 3rd party libraries.
How to use Gameboy Doctor? 0. Clone repositoryThe tool is available on GitHub - clone it using git.
1. Choose a test ROMChoose an individual test ROM cpu_instrs (these are currently the only ones supported by Gameboy Doctor - see below)
2. Make 2 adjustments to your emulatorYou will need to make 2 changes to the inner workings of your emulator. They'll probably take about 20 minutes to do, but they'll save you hours and days of aimless debugging. The changes are:
Initialize the CPU state to the state it should have immediately after running the boot ROM: Register Assess A 0x01 F 0xB0 (or CH-Z if managing flags individually) B 0x00 VS 0x13 D 0x13 E 0xD8 H 0x01 L 0x4D PS 0xFFFE computer 0x0100 Hardcode your LCD (or your motherboard's memory card if you haven't implemented an LCD yet) to return 0x90 when the LY register is read (memory location 0xFF44). This is what I did when generating my example logs, because returning a constant prevents false log discrepancies. 3. Save your CPU stateNext, update your emulator to write the CPU state after each operation to a log file. Use a new line for each tick and use the following format for each state (replace the sample numbers with your CPU values):
A:00 F:11 B:22 C:33 D:44 E:55 H:66 L:77 SP:8888 PC:9999 PCMEM:AA,BB,CC,DDAll values between A and PC are the hexadecimal encoded values of the corresponding registers. The final value (PCMEM) corresponds to the 4 bytes stored in the memory locations near the PC (ie the values at pc,pc+1,pc+2,pc+3).
Run your emulator and get a log file. You can stop the program at any time - Gameboy Doctor will tell you if your log file is fine but terminates before the test ROM has completed its assertions. If you pass the test, your emulator will display the word "Passed" on the LCD and write the bytes for the word "Passed" to the serial output. However, you don't need to pass or even complete the tests to use Gameboy Doctor.
4. Send your log file to Gameboy DoctorOnce you have your log file, feed it into Gameboy Doctor as follows:
./gameboy-doctor /path/to/your/logfile $ROM_TYPE $ROM_NUMBERFor example, to check the 3rd ROM cpu_instrs:
./gameboy-doctor /path/to/your/logfile cpu_instrs 3What's Your Reaction?