Wooden flags filled with epoxy
As some of you may know, I am trying to fund the batteries for my electric vehicle project by selling some custom epoxy filled wooden flags. The motivation for this project was also to try 3D sculpting on my CNC and learn how to cast epoxy successfully. Both that I have never tried before. After a few tries, one error, I think I've found a method and end state that looks pretty cool!
 Materials
Wood - At first I tried gluing and joining 2 flat pieces of 19mm jointed pine, it turned into an epic fail as the glue didn't hold at the joints and the router ended by chipping the sculpture. Also the weight was an issue here as it made the flag VERY heavy for the wall. I ended up going with a single piece of 19mm pine and living with the fact that the flag waves wouldn't be that deep!
Epoxy - For the epoxy side I tried 3 different types and they all seemed to work. The art epoxy in a 2:1 mix ration was plentiful as the pockets I was filling weren't too deep.
Epoxy Tip - Be sure to use some sort of sealant in the pockets, the porous nature of pine meant you could easily see the colored epoxy 'bleeding' into the wood. I ended up using clear epoxy to seal the wood after pocketing. It works fine, but you have to make sure you get into all the little crevices.
Sanding Pads - Because I carved the waves of the flag into the wood, a flat disc on the orbital sander wasn't going to work. I was able to grab some 15mm foam sanding pad attachments that work with any hook and loop orbital sander. This allows the sanding pad to follow the outline of the flags.
Varnish/Sealer - Depending on the finish you want to achieve, you will want to experiment with different wood finishing products. I have about 5 different types. Including a wax.
 CNC Routing the Flags
Although it takes time, it's actually the easiest part. The problem I had was that you can't just burn the 3D flag into wood and then fill it with epoxy. You have to pocket the flag, then fill it with epoxy, let it set, then do the 3D sculpt. If you try to do it in reverse, the epoxy will flow out of the areas you want to fill because it's no longer level. This process wastes a little epoxy, but the results speak for themselves.
I chose 2 flag sizes, 250×500 and 1000×500. The process is the same for each size, however, the time spent on the machine for all toolpaths is extended on the larger flag.
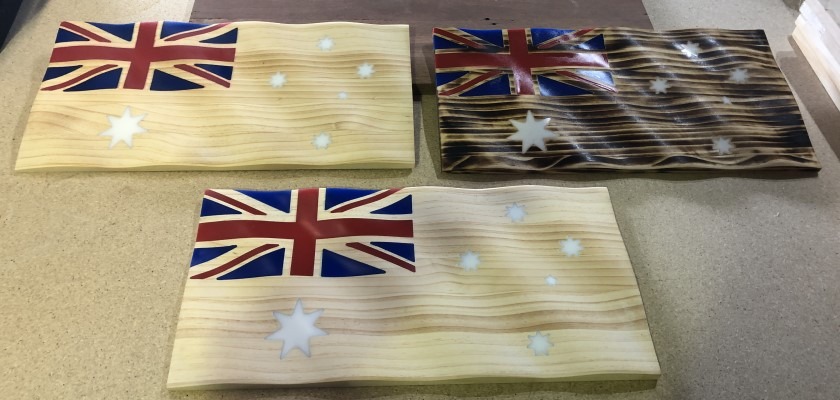
The resultsNo matter what finish I tried to achieve, I think it generally went well. I ended up with a faded blue flag, a burnt flag, a very shiny flag, and even flags with recessed display plates. If you have any other finishing ideas let me know! I would be happy to give them a chance.
As some of you may know, I am trying to fund the batteries for my electric vehicle project by selling some custom epoxy filled wooden flags. The motivation for this project was also to try 3D sculpting on my CNC and learn how to cast epoxy successfully. Both that I have never tried before. After a few tries, one error, I think I've found a method and end state that looks pretty cool!
Materials
Wood - At first I tried gluing and joining 2 flat pieces of 19mm jointed pine, it turned into an epic fail as the glue didn't hold at the joints and the router ended by chipping the sculpture. Also the weight was an issue here as it made the flag VERY heavy for the wall. I ended up going with a single piece of 19mm pine and living with the fact that the flag waves wouldn't be that deep!
Epoxy - For the epoxy side I tried 3 different types and they all seemed to work. The art epoxy in a 2:1 mix ration was plentiful as the pockets I was filling weren't too deep.
Epoxy Tip - Be sure to use some sort of sealant in the pockets, the porous nature of pine meant you could easily see the colored epoxy 'bleeding' into the wood. I ended up using clear epoxy to seal the wood after pocketing. It works fine, but you have to make sure you get into all the little crevices.
Sanding Pads - Because I carved the waves of the flag into the wood, a flat disc on the orbital sander wasn't going to work. I was able to grab some 15mm foam sanding pad attachments that work with any hook and loop orbital sander. This allows the sanding pad to follow the outline of the flags.
Varnish/Sealer - Depending on the finish you want to achieve, you will want to experiment with different wood finishing products. I have about 5 different types. Including a wax.
CNC Routing the Flags
Although it takes time, it's actually the easiest part. The problem I had was that you can't just burn the 3D flag into wood and then fill it with epoxy. You have to pocket the flag, then fill it with epoxy, let it set, then do the 3D sculpt. If you try to do it in reverse, the epoxy will flow out of the areas you want to fill because it's no longer level. This process wastes a little epoxy, but the results speak for themselves.
I chose 2 flag sizes, 250×500 and 1000×500. The process is the same for each size, however, the time spent on the machine for all toolpaths is extended on the larger flag.
The resultsNo matter what finish I tried to achieve, I think it generally went well. I ended up with a faded blue flag, a burnt flag, a very shiny flag, and even flags with recessed display plates. If you have any other finishing ideas let me know! I would be happy to give them a chance.
What's Your Reaction?