Three MakeyBit Projects to Haunt Your Halloween
Hi everyone! My name is Cecilia Hillway and I like to combine art and technology. Today I'm going to talk about how you can use the new MakeyBit Adventure Board to make spooky Halloween projects.
For these projects, I chose to use the Microbit microcontroller with the MakeyBit.
The Makeybit has been such a fun board from the start, that I was so inspired to turn it into different Halloween characters.

Using a pattern I created for the Makeybit, I drew monster costumes to wear and colored them on the computer. Costumes can be made or printed on paper and placed on the Makeybit behind the microcontroller. If you're using something thicker, like cardboard, it's best to leave a hole for the Microbit.
Once the Makeybit has their costumes, you're ready to make plans with them.
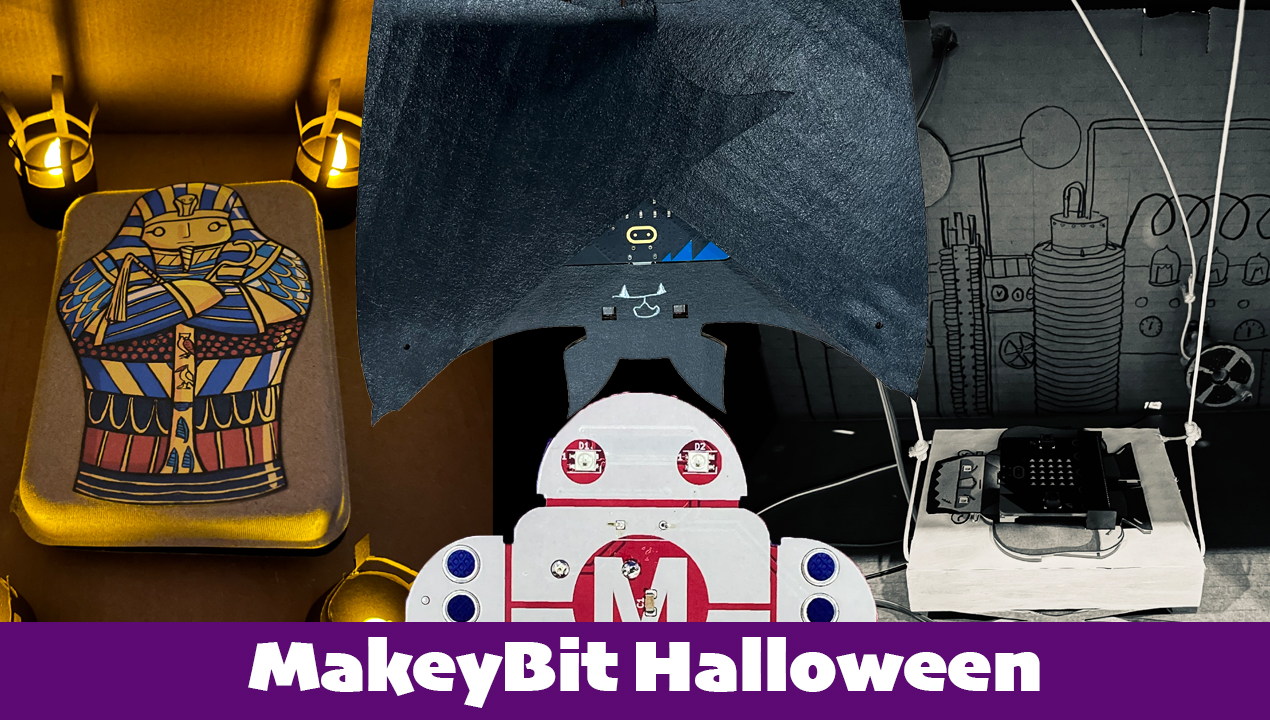
For the first project I did, the Makeybit wears a mummy costume (PDF), so I decided to bring it out of its sarcophagus and into life. I used the packing box the Makeybit comes in as a sarcophagus. I added a drawing of a sarcophagus then I added two micro servos. Here I plug them in to show you how they work. One of the micro servos opens the box and the other lifts the mummy out of the box.
I press the button and have a built in delay so I can put the mummy where it goes and close the lid. But here you see how he will open the lid and lift the mummy. Here is an overview of the mechanics. As you can see I have both servos. They go up and down. One is on the side so it will allow me to close the lid of the sarcophagus as much as possible. Here you can see the rise and fall. By adding props like tealights that are dressed up to make them look like lit torches, I can give the Makeybit project a vibe for the video I shot. Here it comes out, and here is the final video.
The second project is the creation of Frankenstein's monster (PDF). It is inspired by the scene from the classic movie where the monster comes to life. I wanted to incorporate several things into my design, like the mad knife switch that screams mad scientist and a pulley system that helps the stretcher where the monster sits go up and down.
Once the switch is activated, a continuously rotating servo lifts the stretcher up to the ceiling where the Neopixel strip will be located which will simulate lightning for a moment. Lightning is what brings the monster to life. After the flash show is over, the stretcher is lowered. And at the very end, the monster comes to life by lighting up its eyes and the heart starts beating.
For project number three, I decided to turn the Makeybit into a bat (PDF). So the bat hangs upside down in different places. You can see that I mounted its wings with two different micro servos. One is rear mounted and the other is front mounted. This gives the wings a slightly different height. So when it's on (which I'm going to turn it on). So when activated, his wings open and he makes a sound, and his eyes light up. You can see the light which is version 2 of Microbit. This light tells you that she is actively listening to voice volume. Which right now I guess is considered quite noisy. You can change the settings in the code to make it more or less sensitive to sound.
Makeybit is mounted using twist ties that go through the holes and hold the Makeybit in place. Now it has a third twist tie at its feet and that's what allows me to mount it in different places.
Three different spooky projects you can make with the MakeyBit. In the description below we will have links to the templates and code I used if you want to recreate these projects. Please share your creations online with the MakeyBit hashtag.
Hi everyone! My name is Cecilia Hillway and I like to combine art and technology. Today I'm going to talk about how you can use the new MakeyBit Adventure Board to make spooky Halloween projects.
For these projects, I chose to use the Microbit microcontroller with the MakeyBit.
The Makeybit has been such a fun board from the start, that I was so inspired to turn it into different Halloween characters.
Using a pattern I created for the Makeybit, I drew monster costumes to wear and colored them on the computer. Costumes can be made or printed on paper and placed on the Makeybit behind the microcontroller. If you're using something thicker, like cardboard, it's best to leave a hole for the Microbit.
Once the Makeybit has their costumes, you're ready to make plans with them.
For the first project I did, the Makeybit wears a mummy costume (PDF), so I decided to bring it out of its sarcophagus and into life. I used the packing box the Makeybit comes in as a sarcophagus. I added a drawing of a sarcophagus then I added two micro servos. Here I plug them in to show you how they work. One of the micro servos opens the box and the other lifts the mummy out of the box.
I press the button and have a built in delay so I can put the mummy where it goes and close the lid. But here you see how he will open the lid and lift the mummy. Here is an overview of the mechanics. As you can see I have both servos. They go up and down. One is on the side so it will allow me to close the lid of the sarcophagus as much as possible. Here you can see the rise and fall. By adding props like tealights that are dressed up to make them look like lit torches, I can give the Makeybit project a vibe for the video I shot. Here it comes out, and here is the final video.
The second project is the creation of Frankenstein's monster (PDF). It is inspired by the scene from the classic movie where the monster comes to life. I wanted to incorporate several things into my design, like the mad knife switch that screams mad scientist and a pulley system that helps the stretcher where the monster sits go up and down.
Once the switch is activated, a continuously rotating servo lifts the stretcher up to the ceiling where the Neopixel strip will be located which will simulate lightning for a moment. Lightning is what brings the monster to life. After the flash show is over, the stretcher is lowered. And at the very end, the monster comes to life by lighting up its eyes and the heart starts beating.
For project number three, I decided to turn the Makeybit into a bat (PDF). So the bat hangs upside down in different places. You can see that I mounted its wings with two different micro servos. One is rear mounted and the other is front mounted. This gives the wings a slightly different height. So when it's on (which I'm going to turn it on). So when activated, his wings open and he makes a sound, and his eyes light up. You can see the light which is version 2 of Microbit. This light tells you that she is actively listening to voice volume. Which right now I guess is considered quite noisy. You can change the settings in the code to make it more or less sensitive to sound.
Makeybit is mounted using twist ties that go through the holes and hold the Makeybit in place. Now it has a third twist tie at its feet and that's what allows me to mount it in different places.
Three different spooky projects you can make with the MakeyBit. In the description below we will have links to the templates and code I used if you want to recreate these projects. Please share your creations online with the MakeyBit hashtag.
What's Your Reaction?