Photography, The Stereo Way
Most consumer audio equipment has been in stereo since at least the 1960s, allowing the listener to experience sounds with a three-dimensional perspective as if they were present when the sound was first created. 'origin. Stereo photography, however, lags a bit behind the stereo audio trend, with most technologies existing as passing fads or requiring clumsy hardware to take full advantage of. That's not the case with DIY stereoscopic cameras like this one produced by this group of 3D photography enthusiasts, who also have methods to view photos in 3D without additional hardware.
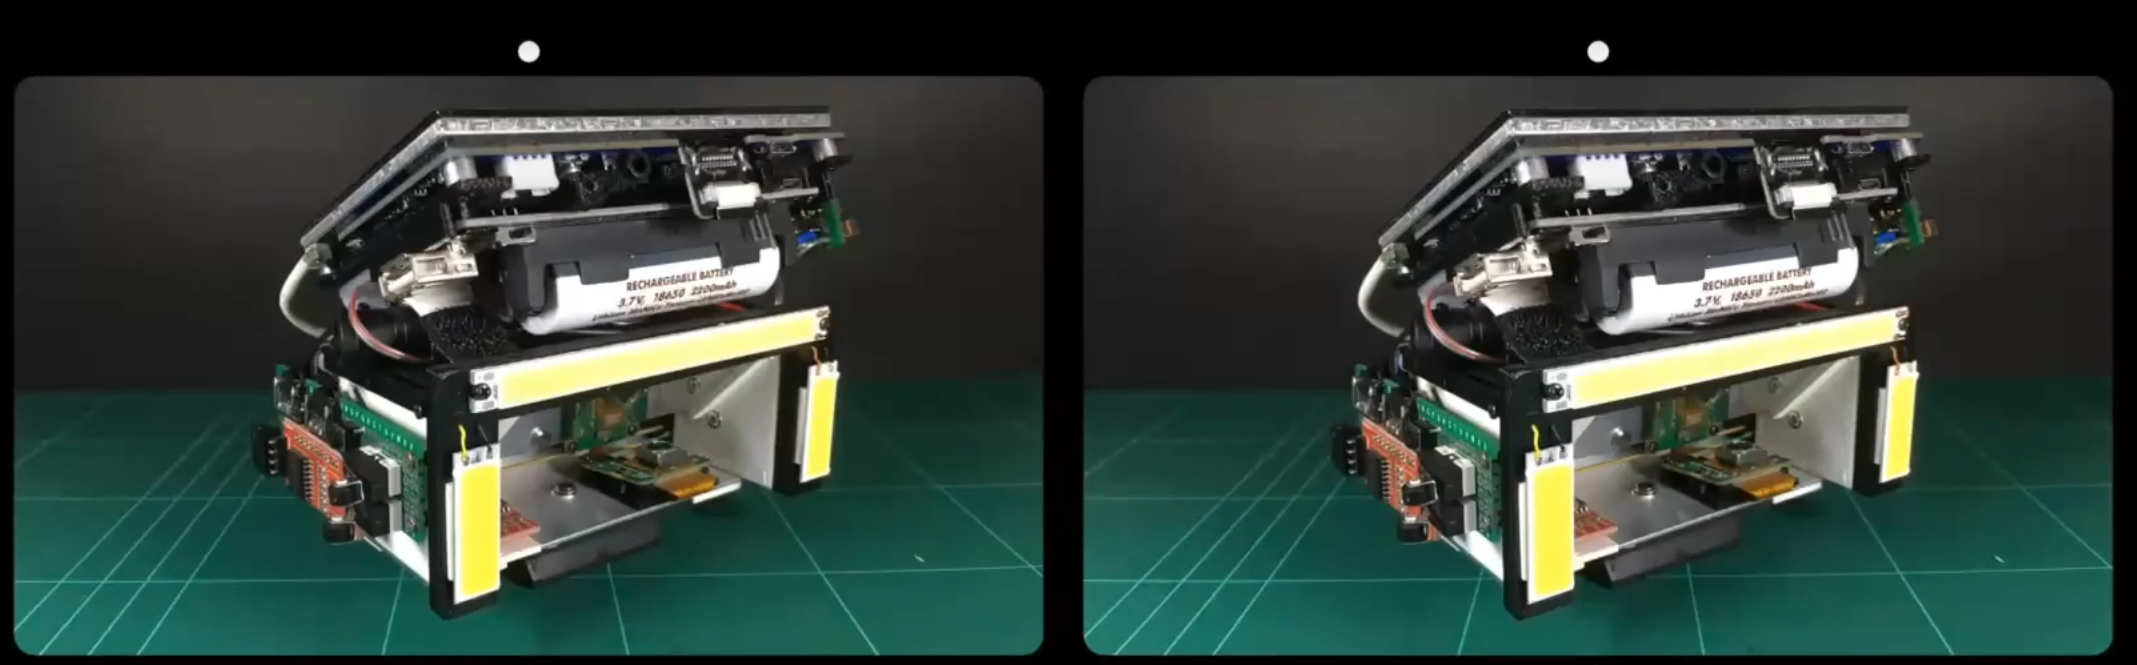
The camera uses two imaging sensors to produce a stereo image. One sensor is fixed and the other is on a slider that allows the user to adjust the "amount" of 3D effect needed for a particular photo. [Jim] uses this camera primarily for macro photography, which means he only needs a few millimeters of separation between the two sensors to achieve the desired effect, but for objects further away, more separation can be used. The camera uses two Raspberry Pi processors, a lithium battery and a touch screen interface. It also includes a ton of features, including things like focus stacking, but to get the fuller experience of this build, we highly recommend watching the video after the break.
When it comes to viewing photographs, these stereoscopic 3D images require nothing more than a little practice to view. This guide comes with a few simple examples to get you started, and although it looks like a Magic Eye puzzle from the late 90s at first glance, it quickly becomes intuitive. Another guide also has more complex 3D maps at the end to practice. This is quite the step forward compared to using special glasses or any portable 3D viewer. There are also methods for creating 3D images from those taken with an ordinary 2D camera.
Thanks to [Bill] for the tip and additional links to guides to viewing these images!
Most consumer audio equipment has been in stereo since at least the 1960s, allowing the listener to experience sounds with a three-dimensional perspective as if they were present when the sound was first created. 'origin. Stereo photography, however, lags a bit behind the stereo audio trend, with most technologies existing as passing fads or requiring clumsy hardware to take full advantage of. That's not the case with DIY stereoscopic cameras like this one produced by this group of 3D photography enthusiasts, who also have methods to view photos in 3D without additional hardware.
The camera uses two imaging sensors to produce a stereo image. One sensor is fixed and the other is on a slider that allows the user to adjust the "amount" of 3D effect needed for a particular photo. [Jim] uses this camera primarily for macro photography, which means he only needs a few millimeters of separation between the two sensors to achieve the desired effect, but for objects further away, more separation can be used. The camera uses two Raspberry Pi processors, a lithium battery and a touch screen interface. It also includes a ton of features, including things like focus stacking, but to get the fuller experience of this build, we highly recommend watching the video after the break.
When it comes to viewing photographs, these stereoscopic 3D images require nothing more than a little practice to view. This guide comes with a few simple examples to get you started, and although it looks like a Magic Eye puzzle from the late 90s at first glance, it quickly becomes intuitive. Another guide also has more complex 3D maps at the end to practice. This is quite the step forward compared to using special glasses or any portable 3D viewer. There are also methods for creating 3D images from those taken with an ordinary 2D camera.
Thanks to [Bill] for the tip and additional links to guides to viewing these images!
What's Your Reaction?